ResNet
Deep Residual Learning for Image Recognition
2015
Resnet残差网络的初衷
ResNet 解决的不是梯度弥散或爆炸问题,Kaiming 的论文中也说了:臭名昭著的梯度弥散/爆炸问题已经很大程度上被 normalized initialization and intermediate normalization layers 解决了;
ResNet解决传统深度神经网络造成的问题:
梯度消失
网络性能退化
可以认为Residual Learning的初衷,其实是让模型的内部结构至少有恒等映射的能力。以保证在堆叠网络的过程中,网络至少不会因为继续堆叠而产生退化!
每一层卷积都是将底层的特征提取出来组合成高级特征,所以网络的层数越多,后面的特征描述的东西越抽象。
首先,浅层网络都是希望学习到一个恒等映射函数 $H(X) = X$ ,其中 = 是指用 $H(x)$ 这个特征/函数来代表原始 $x$ 的信息,但随着网络的加深这个恒等映射变得越来越难以拟合。
因此,Resnet 提出将网络设计为 $F(x) = H(x) - x$,只要残差 $F(x) = 0$ ,就构成了一个恒等映射 $H(x) = x$ ,并且相对于拟合恒等映射关系,拟合残差更容易。
从浅层到深层学习到的特征 $y = x + F(x,W)$,其中 F(x,W) 就是带权卷积后的结果,我们进行反向求梯度:
$\frac {dloss}{dx} = \frac {dloss}{dy} * \frac {dy}{dx} = \frac {dloss}{dy} * (1 + \frac {dF(x,W)}{dx})$
Think of any arbitrary task such as playing basketball. You might not be the best out of your friends, but you know what the best look like after watching the Golden State Warriors play all season. So the question is, how do you get from where you are to the level Stephen Curry is playing at? There are two ways of looking at your progress: “how do I be as good as Steph Curry?” and “what steps do I need to take to be as good as Steph?”. Which do you think is the better question to ask?
These two questions are asking the exact same question, but this is the same thought process that led to the key findings behind ResNets. The first question is comparable to a traditional network where you’re given a starting point and need to find a way to get to your goal or F(x)=H(x)-x. ResNet asks the second question. Given a starting point, how do you take constantly improve, taking into account your past state and your improvement at every step or H(x)=F(x)+x.
Back to the degradation problem. Let’s say x is equal to the optimal solution. In a ‘plain’ network, F(x) would still need to do the work of creating a non-linear function that maps to x. However ResNets utilize past features in it’s forward propagation. Therefore in this particular scenario, F(x) would optimize to 0 if x is already the solution. While this scenario isn’t very likely, it highlights the cause of degradation in deep networks, as well as residual learning’s approach to solving it.
H(x) 是期望拟合的特征图,这里叫做 desired underlying mapping
一个building block要拟合的就是这个潜在的特征图
当没有使用残差网络结构时,building block的映射F(x)需要做的就是拟合H(x)
当使用了残差网络时,就是加入了 skip connection 结构,这时候由一个 building block 的任务由: F(x) = H(x),变成了 F(x) = H(x)-x
对比这两个待拟合的函数,文中说假设拟合残差图更容易优化,也就是说:
F(x) = H(x)-x 比 F(x) = H(x) 更容易优化,接下来举了一个例子,极端情况下:
desired underlying mapping 要拟合的是 identity mapping,这时候残差网络的任务就是拟合 F(x)=0,而原本的 plain 结构的话就是 F(x) =x,而 F(x)=0 任务会更容易,原因是: resnet(残差网络)的 F(x)究竟长什么样子?
F 是求和前网络映射,H 是从输入到求和后的网络映射。比如把 5 映射到 5.1,那么引入残差前是 F’(5)=5.1,引入残差后是 H(5)=5.1, H(5)=F(5)+5, F(5)=0.1。这里的 F’ 和 F 都表示网络参数映射,引入残差后的映射对输出的变化更敏感。比如 s 输出从 5.1 变到 5.2,映射F’的输出增加了 1/51=2%,而对于残差结构输出从 5.1 到 5.2,映射 F 是从 0.1 到 0.2,增加了 100%。明显后者输出变化对权重的调整作用更大,所以效果更好。
残差的思想都是去掉相同的主体部分,从而突出微小的变化,看到残差网络我第一反应就是差分放大器。
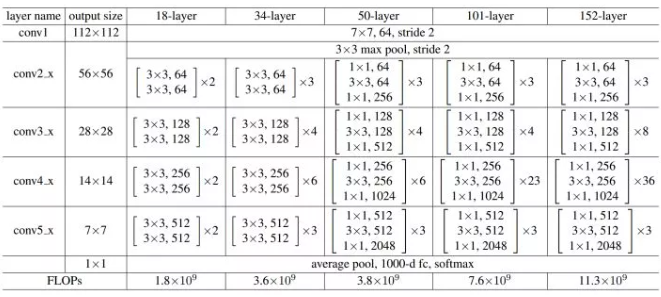
Resnet18 和 Resnet101 在实现时候有个最大的不同是哪里?Resnet小于50layers和大于50layers结构区别在哪里?
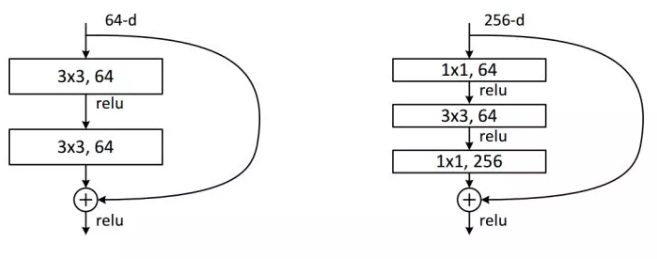
50层以下叫 basic block 3*3,3*3,
50层以上叫 Bottleneck block 1*1,3*3,1*1,channel 64 64 256 减少参数
ResNet50起,就采用Bottleneck结构,主要是引入1x1卷积。我们来看一下这里的1x1卷积有什么作用:
对通道数进行升维和降维(跨通道信息整合),实现了多个特征图的线性组合,同时保持了原有的特征图大小;
相比于其他尺寸的卷积核,可以极大地降低运算复杂度;
如果使用两个 3x3 卷积堆叠,只有一个relu,但使用1x1卷积就会有两个relu,引入了更多的非线性映射;

我们来计算一下 1 * 1 卷积的计算量优势:
首先看上图右边的bottleneck结构,对于256维的输入特征,参数数目:
1x1x256x64+3x3x64x64+1x1x64x256=69632,
如果同样的输入输出维度但不使用1x1卷积,而使用两个3x3卷积的话,参数数目:
(3x3x256x256)x2=1179648。
简单计算下就知道了,使用了 1x1 卷积的 bottleneck 将计算量简化为原有的 5.9%,收益超高。

整个 ResNet 不使用 dropout,全部使用 BN。此外,回到最初的这张细节图,我们不难发现一些规律和特点:
受 VGG 的启发,卷积层主要是 3×3 卷积;
对于相同的输出特征图大小的层,即同一 stage,具有相同数量的 3x3 滤波器;
如果特征地图大小减半,滤波器的数量加倍以保持每层的时间复杂度;(这句是论文和现场演讲中的原话,虽然我并不理解是什么意思)
每个 stage 通过步长为 2 的卷积层执行下采样,而却这个下采样只会在每一个 stage 的第一个卷积完成,有且仅有一次。
网络以平均池化层和 softmax 的 1000 路全连接层结束,实际上工程上一般用自适应全局平均池化 (Adaptive Global Average Pooling);
# -*- coding: utf-8 -*-
"""Untitled16.ipynb

Automatically generated by Colaboratory.

Original file is located at
    https://colab.research.google.com/drive/1PBNv8qCKce_i_BG_kFjDUSuiEqNtcY1U
"""

import torch
# import一下nn这个模块, 该模块已经封装了定义ResNet所需要的所有函数
import torch.nn as nn
from torch.hub import load_state_dict_from_url

## 已经训练好的模型权重值
model_urls = {
    'resnet18': 'https://download.pytorch.org/models/resnet18-5c106cde.pth',
    'resnet34': 'https://download.pytorch.org/models/resnet34-333f7ec4.pth',
    'resnet50': 'https://download.pytorch.org/models/resnet50-19c8e357.pth',
    'resnet101': 'https://download.pytorch.org/models/resnet101-5d3b4d8f.pth',
    'resnet152': 'https://download.pytorch.org/models/resnet152-b121ed2d.pth',
    'resnext50_32x4d': 'https://download.pytorch.org/models/resnext50_32x4d-7cdf4587.pth',
    'resnext101_32x8d': 'https://download.pytorch.org/models/resnext101_32x8d-8ba56ff5.pth',
    'wide_resnet50_2': 'https://download.pytorch.org/models/wide_resnet50_2-95faca4d.pth',
    'wide_resnet101_2': 'https://download.pytorch.org/models/wide_resnet101_2-32ee1156.pth',
}

# 定义一下conv3x3,残差模块中都有至少一个3x3 的卷积
#return的地方直接返回一个Conv2d的输出, 卷积核预设为3, padding值为1
def conv3x3(in_planes, out_planes, stride=1, padding=1):
  return nn.Conv2d(in_planes, out_planes, kernel_size=3, stride=stride, padding=padding, bias=False)  #? Why no bias:如果卷积层之后是BN层,那么可以不用偏置参数,被激活函数前的BatchNorm层的 β 给取代了,可以节省内存,具体原因请看论文 Section 3.2 Batch Normalization: Accelerating Deep Network Training by Reducing Internal Covariate Shift.

# 定义一下conv1x1
def conv1x1(in_planes, out_planes, stride=1):
  return nn.Conv2d(in_planes, out_planes, kernel_size=1, stride=stride, bias=False) #? Why no bias: 如果卷积层之后是BN层,那么可以不用偏置参数,可以节省内存

# 定义一个类继承nn.Module模块
# 类的初始化中, 定义所有会用到的属性(conv, bn, relu)
# 定义forward function建立数据输入到return的过程

class BasicBlock(nn.Module):
  expansion = 1 # 经过Block之后channel的变化量,主要是定义输出通道的放大倍率, 在bottleneck会用上

  def __init__(self, inplanes, planes, stride=1, downsample=None, norm_layer=None):
    # downsample: 调整维度一致之后才能相加
    # norm_layer:batch normalization layer
    #记得继承父类
    super(BasicBlock, self).__init__()
    if norm_layer is None:
      norm_layer = nn.BatchNorm2d # 如果bn层没有自定义,就使用标准的bn层
    self.conv1 = conv3x3(inplanes, planes, stride)
    #BN通常依据上一层输出的维度做BN
    self.bn1 = norm_layer(planes)
    #inplace表示对原数据修改,而非产生新数据,节省内存
    self.relu = nn.ReLU(inplace=True)
    self.conv2 = conv3x3(planes, planes)
    self.bn2 = norm_layer(planes)
    self.downsample = downsample
    self.stride = stride

  def forward(self, x):
    identity = x  # 保存x

    out = self.conv1(x)
    out = self.bn1(out)
    out = self.relu(out)

    out = self.conv2(out)
    out = self.bn2(out)

    if self.downsample is not None:
      identity = self.downsample(x)  # downsample调整x的维度,F(x)+x一致才能相加

    out += identity
    out = self.relu(out) # 先相加再激活

    return out

# 残差模块Bottleneck, 加入了conv1x1 减少了参数量, 主要给网络层数较深的使用
class Bottleneck(nn.Module):
  #expansion = 4 :bottleneck的最后一层1x1输出的维度是第1(conv1x1), 2(conv3x3)层的四倍, 因此放大倍率为4
  expansion = 4

  def __init__(self, inplanes, planes, stride=1, downsample=None, norm_layer=None):
    super(Bottleneck, self).__init__()
    if norm_layer is None:
      norm_layer = nn.BatchNorm2d
    # 主结构变成 1x1, 3x3, 1x1
    self.conv1 = conv1x1(inplanes, planes)
    self.bn1 = norm_layer(planes)
    self.conv2 = conv3x3(planes, planes, stride)
    self.bn2 = norm_layer(planes)
    self.conv3 = conv1x1(planes, planes * self.expansion) # 输入的channel数:planes * self.expansion
    self.bn3 = norm_layer(planes * self.expansion)
    self.relu = nn.ReLU(inplace=True)
    self.downsample = downsample
    self.stride = stride

  def forward(self, x):
    identity = x

    out = self.conv1(x)
    out = self.bn1(out)
    out = self.relu(out)

    out = self.conv2(out)
    out = self.bn2(out)
    out = self.relu(out)

    out = self.conv3(out)
    out = self.bn3(out)

    if self.downsample is not None:
      identity = self.downsample(x)

    out += identity
    out = self.relu(out)

    return out

class ResNet(nn.Module):
  def __init__(self, block, layers, num_class=1000, norm_layer=None):
    super(ResNet, self).__init__()
    if norm_layer is None:
      norm_layer = nn.BatchNorm2d
    self._norm_layer = norm_layer
    # 第一个stage通道数一定是64, 因为先经过(64, 7, 7)的conv1
    self.inplanes = 64

    # conv1 in ppt figure
    self.conv1 = nn.Conv2d(3, self.inplanes, kernel_size=7, stride=2, padding=3, bias=False)
    self.bn1 = norm_layer(self.inplanes)
    self.relu = nn.ReLU(inplace=True)
    self.maxpool = nn.MaxPool2d(kernel_size=3, stride=2, padding=1)
    self.layer1 = self._make_layer(block, 64, layers[0])
    self.layer2 = self._make_layer(block, 128, layers[1], stride=2)
    self.layer3 = self._make_layer(block, 256, layers[2], stride=2)
    self.layer4 = self._make_layer(block, 512, layers[3], stride=2)

    # 全局平均池化
    self.avgpool = nn.AdaptiveAvgPool2d((1,1))  # (1,1)等于GAP
    self.fc = nn.Linear(512*block.expansion, num_class)

    for m in self.modules():
            #只要是卷积都操作, 都对weight和bias进行kaiming初始化
            if isinstance(m, nn.Conv2d):
                nn.init.kaiming_normal_(m.weight, mode='fan_out', nonlinearity='relu')
            #bn层都权重初始化为1, bias=0
            elif isinstance(m, (nn.BatchNorm2d, nn.GroupNorm)):
                nn.init.constant_(m.weight, 1)
                nn.init.constant_(m.bias, 0)

  # ResNet 的 stage 2~5实现,然后利用列表将每一个stage的blocks数目装进
  def _make_layer(self, block, planes, blocks, stride=1):
    # 生成不同的stage/layer
    # block: block type(basic block/bottle block)
    # blocks: blocks的数量
    norm_layer = self._norm_layer
    downsample = None

    if stride != 1 or self.inplanes != planes * block.expansion:
      # 需要调整维度
      downsample = nn.Sequential(
          conv1x1(self.inplanes, planes * block.expansion, stride),  # 同时调整spatial(H x W))和channel两个方向
          norm_layer(planes * block.expansion)
      )

    layers = []
    layers.append(block(self.inplanes, planes, stride, downsample, norm_layer)) # 第一个block单独处理
    # 确保上一层输出与下一层的输入通道数相同
    self.inplanes = planes * block.expansion  # 记录layerN的channel变化,具体请看ppt resnet表格
    # blocks(设定每stage多少blocks), 有几个block就添加blocks-1个(前面已经添加第一个block)
    for _ in range(1, blocks): # 从1开始循环,因为第一个模块前面已经单独处理
      layers.append(block(self.inplanes, planes, norm_layer=norm_layer))
    return nn.Sequential(*layers)  # 使用Sequential层组合blocks,形成stage。如果layers=[2,3,4],那么*layers=?9层

  def forward(self, x):
    x = self.conv1(x)
    x = self.bn1(x)
    x = self.relu(x)
    x = self.maxpool(x)

    x = self.layer1(x)
    x = self.layer2(x)
    x = self.layer3(x)
    x = self.layer4(x)

    x = self.avgpool(x)
    x = torch.flatten(x, 1)
    x = self.fc(x)

    return x

def _resnet(arch, block, layers, pretrained, progress, **kwargs):
    model = ResNet(block, layers, **kwargs)
    if pretrained:
        state_dict = load_state_dict_from_url(model_urls[arch],
                                              progress=progress)
        model.load_state_dict(state_dict)
    return model

# 调用ResNet这个类, 并且指定需要传入的block类别
def resnet18(pretrained=False, progress=True, **kwargs):
    r"""ResNet-18 model from
    `"Deep Residual Learning for Image Recognition" <https://arxiv.org/pdf/1512.03385.pdf>`_
    Args:
        pretrained (bool): If True, returns a model pre-trained on ImageNet
        progress (bool): If True, displays a progress bar of the download to stderr
    """
    return _resnet('resnet18', BasicBlock, [2, 2, 2, 2], pretrained, progress,
                   **kwargs)

def resnet50(pretrained=False, progress=True, **kwargs):
    r"""ResNet-50 model from
    `"Deep Residual Learning for Image Recognition" <https://arxiv.org/pdf/1512.03385.pdf>`_
    Args:
        pretrained (bool): If True, returns a model pre-trained on ImageNet
        progress (bool): If True, displays a progress bar of the download to stderr
    """
    return _resnet('resnet50', Bottleneck, [3, 4, 6, 3], pretrained, progress,
                   **kwargs)

model = resnet18(pretrained=True)
model.eval()

import torch
model2 = torch.hub.load('pytorch/vision:v0.4.2', 'resnet18', pretrained=True)
# or any of these variants
# model = torch.hub.load('pytorch/vision:v0.4.2', 'resnet34', pretrained=True)
# model = torch.hub.load('pytorch/vision:v0.4.2', 'resnet50', pretrained=True)
# model = torch.hub.load('pytorch/vision:v0.4.2', 'resnet101', pretrained=True)
# model = torch.hub.load('pytorch/vision:v0.4.2', 'resnet152', pretrained=True)
model2.eval()

model.state_dict()

model2.state_dict()

# Download an example image from the pytorch website
import urllib
url, filename = ("https://github.com/pytorch/hub/raw/master/dog.jpg", "dog.jpg")
try: urllib.URLopener().retrieve(url, filename)
except: urllib.request.urlretrieve(url, filename)

# sample execution (requires torchvision)
from PIL import Image
from torchvision import transforms
input_image = Image.open(filename)
preprocess = transforms.Compose([
    transforms.Resize(256),
    transforms.CenterCrop(224),
    transforms.ToTensor(),
    transforms.Normalize(mean=[0.485, 0.456, 0.406], std=[0.229, 0.224, 0.225]),
])
input_tensor = preprocess(input_image)
input_batch = input_tensor.unsqueeze(0) # create a mini-batch as expected by the model

# move the input and model to GPU for speed if available
if torch.cuda.is_available():
    input_batch = input_batch.to('cuda')
    model.to('cuda')

with torch.no_grad():
    output = model(input_batch)
# Tensor of shape 1000, with confidence scores over Imagenet's 1000 classes
print(output[0])
# The output has unnormalized scores. To get probabilities, you can run a softmax on it.
print(torch.nn.functional.softmax(output[0], dim=0))

result = torch.nn.functional.softmax(output[0], dim=0)

result.argmax()
ResNet 常见的改进
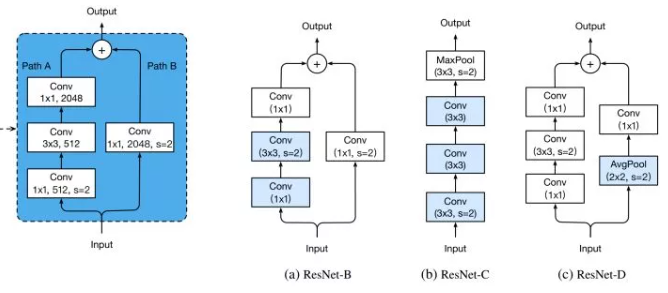
改进 downsample 部分,减少信息流失。前面说过了,每个 stage 的第一个conv都有下采样的步骤,我们看左边第一张图左侧的通路,input 数据进入后在会经历一个 stride=2 的 1 * 1 卷积,将特征图尺寸减小为原先的一半,请注意 1x1 卷积和 stride=2 会导致输入特征图3/4的信息不被利用,因此 ResNet-B 的改进就是就是将下采样移到后面的3x3卷积里面去做,避免了信息的大量流失。
ResNet-D则是在ResNet-B的基础上将identity部分的下采样交给avgpool去做,避免出现1x1卷积和stride同时出现造成信息流失。
ResNet-C则是另一种思路,将ResNet输入部分的7x7大卷积核换成3个3x3卷积核,可以有效减小计算量,这种做法最早出现在Inception-v2中。其实这个 ResNet-C 我比较疑惑,ResNet论文里说它借鉴了VGG的思想,使用大量的小卷积核,既然这样那为什么第一部分依旧要放一个7x7的大卷积核呢,不知道是出于怎样的考虑,但是现在的多数网络都把这部分改成3个3x3卷积核级联。

ResNet 改进之 ResNeXt、ResNeSt
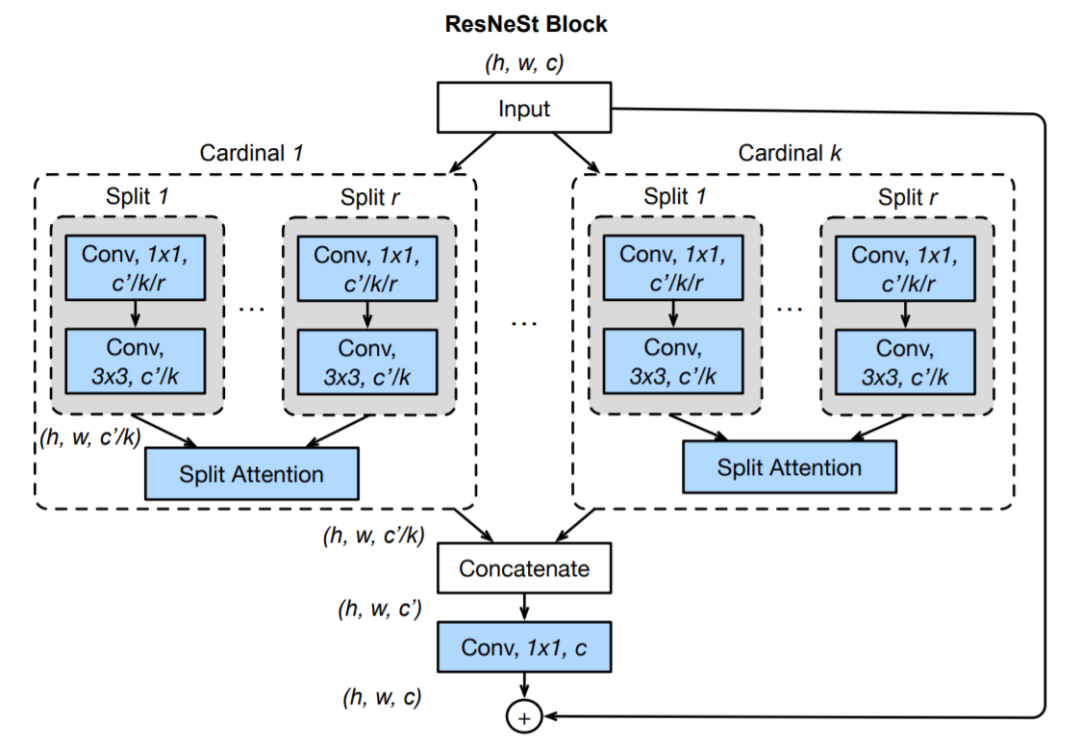
ResNeXt是FAIR的大神们(恺明、Ross、Piotr等)对ResNet的改进。其关键核心模块如下所示。尽管 ResNeSt 与 ResNeXt 比较类似,不过两者在特征融合方面存在明显的差异:ResNeXt 采用一贯的 Add 方式,而 ResNeSt 则采用的 Cat 方式。这是从 Cardinal 角度来看,两者的区别所在。这点区别也导致了两种方式在计算量的差异所在。其中,inception block 人工设计痕迹比较严重,因此引入参数 K,直接将子模型均分,有 K 个 bottleneck 组成。
ResNeSt 提出了一种模块化 Split-Attention 块,可以将注意力分散到若干特征图组中。按照 ResNet 的风格堆叠这些 Split-Attention 块,研究者得到了一个 ResNet 的新变体,称为 ResNeSt。它保留了整体的 ResNet 结构,可直接用于下游任务,但没有增加额外的计算量。主要是基于 SENet,SKNet 和 ResNeXt,把 attention 做到 group level。

参考链接:
https://mc.ai/understanding-resnet-intuitively/
何凯明 Resnet 演讲
ResNet到底在解决一个什么问题呢?
请多多指教。
文章标题:ResNet
本文作者:顺强
发布时间:2019-12-18, 23:59:00
原始链接:http://shunqiang.ml/paper-resnet/版权声明: "署名-非商用-相同方式共享 4.0" 转载请保留原文链接及作者。

